Mapping Tool
Using the mapping tool you can define semantic mappings between the source and target schemas. An XSLT is then generated, based on these mappings, that can automatically convert all imported items.
Clicking on the "Mapping editor" icon ( ) from overview appears the following pane in which you can
- Create a new mapping by selecting the target schema and giving a name to your mapping.
- Create a new mapping using as a template one of the existing mappings.
- Edit an existing mapping.
- Share a mapping.
- Delete a mapping.
- Download a mapping.

The actions that create or edit a mapping instantiate the mapping tool environment that is shown in the following figure.
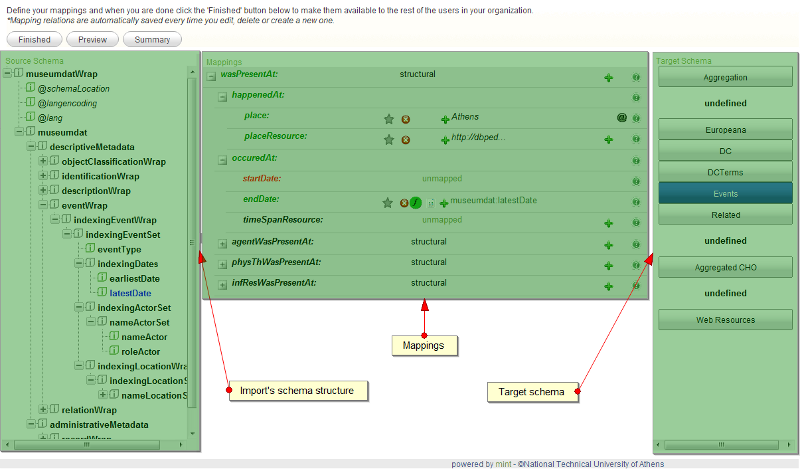
Source schema
On the left of the mapping tool there is a tree like structure of the source schema similar to the one presented during item root declaration (see Item_root). You can navigate in the schema by clicking the nodes on the left of the tree elements. icon is used for structural elements do not contain data values.
  icon is used for leaf elements with data.
- Elements starting with '@' are attributes of the corresponding father.
- Elements in blue are elements that have been already used in this mapping.
More information about the schema elements is provided by clicking the ![]() icon. This action invokes a panel as shown in the following figure:
icon. This action invokes a panel as shown in the following figure:

This panel contains two tabs: Values and Mapping. The Values tab shows the following information about the specific element:
- Namespace: The XML namespace to which this element belongs.
- Name: The element name.
- Count: The number of times the XPath of this element exists in the imported dataset.
- Distinct Count: The number of unique values associated with this XPath in the imported dataset.
- Example: A sample of these values sorted by their frequency of appearance in the imported dataset.
The Mapping tab shows where and how the specified element is being used in the mapping that is being edited.
Target Schema & Mapping Area
The target XML schema is seperated into sections that appear as buttons on the right side of the mapping tool. These buttons are used to navigate to specific parts of the target XML schema. By clicking these buttons, the corresponding part is loaded in the middle of the mapping tool along with its specified mappings.
Each row in the mapping area corresponds to a mapping element of the target XML schema.- Rows with the
 button to left of their name are structural elements and contain other elements, they can be expanded by clicking on it.
 - The elements that contain data have an 'unmapped' area which can be used to defined mappings.
- Elements can also have attributes which can be seen by clicking the
 icon when available.
 - Information about each element can be provided by clicking the corresponding
 icon on the right of the element row.
 - Elements with green names are elements with mappings or have children with mappings.
- Elements with red names are mandatory elements that have no defined mappings or have mandatory children with no mappings defined.
Define Mappings
Various mapping types are available by using the mapping tool.- XPath mapping: Using this type of mapping you can copy data from a source element to a target element. To define this kind of mapping, drag n’ drop a source element to the ‘unmapped’ area of a target element. The source element will then appear in the unmapped area of the target element.
- If the target's schema cardinality permits more than one element then
 icon appears on the left of the source element name. By clicking the on it, an additional unmapped area appears for the same target element.
- If the target's schema cardinality permits more than one element then
- Double clicking on the unmapped area will define a constant value mapping. You can type a constant value in the provided text field. The value will then appear in the mapping area and in the result XML files. This type of mapping is useful for text that is intended to appear in all transformed items. Constant value mappings can be combined with XPath mappings to construct specific values such as URLs.

After performing the mapping of the node to the element, four new icons will appear, each one representing a different operation:
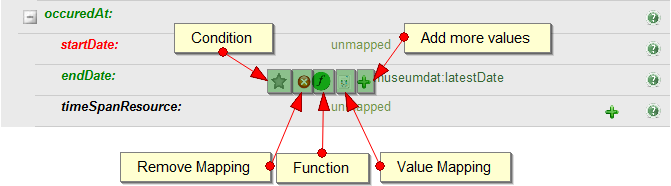
 - Condition. Allows you to specify conditions. When the actual transformation will take place, the specified mapping for each item will be performed if and only if the specified condition is satisfied. This check will be performed for every item.
 - Remove mapping. Deletes the mapping.
 - Function icon. Allows you to specify a transformation function. This operation is useful when you want to transform the original text before inserting it at the specified element. For example, consider the case that you map the original title to an element. All your titles are in the form item_title, and you want to remove the leading "item_" from each title. You can use the substring after function to keep the important part of the title. See Appendix I - Functions for further function explanations.
- - Add more values. Allows you to add more values to the element. These values may originate from different parts of the tree. An example could be the title of an item in multiple languages. The mapping process for each additional value is exactly the same as in the first one.
 - Value mapping. Allows you to map specific input values to specif output values.
Conditions
Mappings can be restricted so that they will apply only under certain conditions. To define these conditions the button is used. This will allow the input of condition as shown in the following figure:

The conditions supported are in the form of <Source XPath> = <Constant Value>. The corresponding mapping will apply only if the source XPath data for a specific item equals to the constant value provided. The condition source XPath can be set by dragging n’ dropping a source element to the condition input area as shown in the previews Figure. The constant value can be set by double clicking on the constant value area.
If a more complex condition is required then the provided condition editor must be used by clicking on the  icon next to the condition. An example of the condition editor is shown in the following figure:

The condition editor provides the means to define more complex conditions. In addition to each clause’s source element and constant value, the relational operator can be set. The logical operator that combines the clauses can also be defined. Additional clauses or subclauses can also be created as needed, by clicking the corresponding icon.
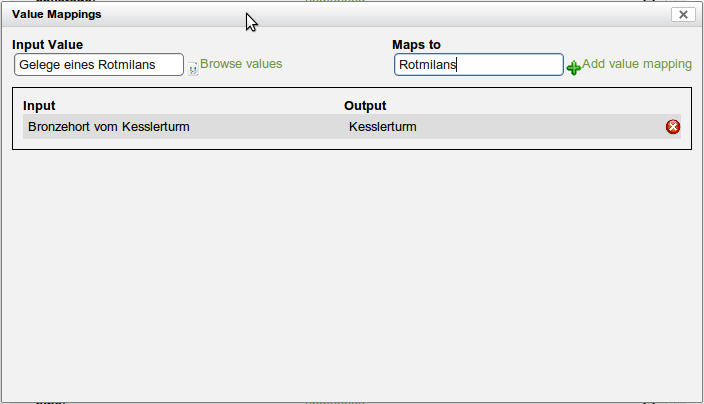
Value Mapping
Clicking on appears the following pane. On the left of the pane you specify the input value of the selected element or you can browse values by clicking on the link, while on the right of the pane you specify the desired output value. After that you add the value mapping link and the mapping you've entered appears on the bottom of the pane. You can remove a value mapping by clicking on the icon on the right of it.
Preview & Mapping Summary
A summary of the defined mappings can be seen by clicking the ‘Summary’ button on the top of the mapping tool. This will invoke the following panel:
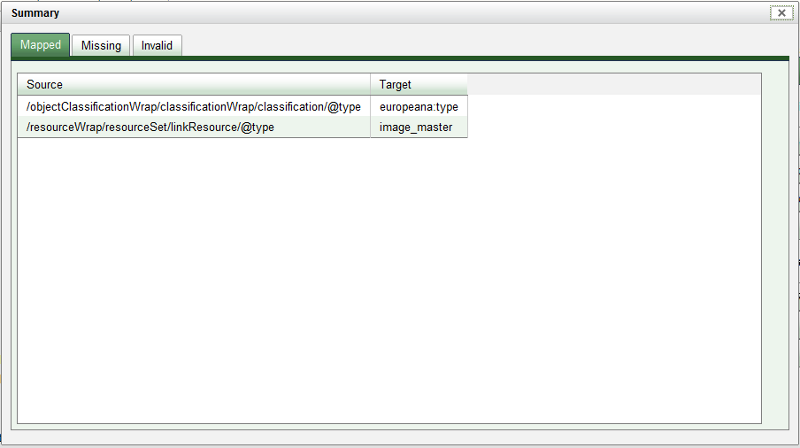
This panel contains the following tabs:
- Mapped: All mapped source elements and the corresponding target elements.
- Missing: Mandatory target elements that have no mappings.
- Invalid: If a mapping definition was loaded based on another dataset, all XPaths form this dataset that do not exist in the current dataset appear in this tab.
The generated XSL can be previewed at any time by clicking the ‘Preview’ button on the top of the mapping tool. This will invoke a panel that may look like the ones in the following figures:
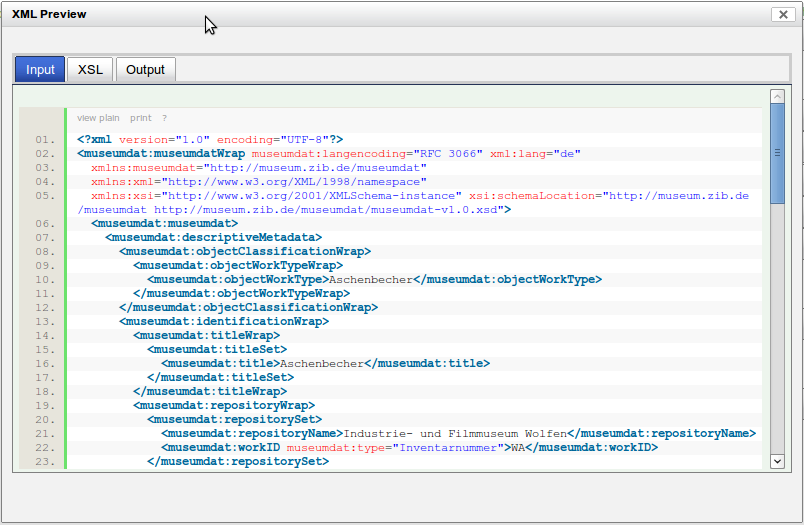
This panel may contain the following tabs:
- Input: The XML that corresponds to the first item from the imported dataset.
- XSL: The generated XSL.
- Output: The item transformed to the target schema based on the previous XSL